I would like to port match it to the heads, but one step at a time.
*edit* I think I make this process a lot longer than it should be. If I dedicated a few full days without interruption it probably would be done in a decent amount of time.
The trick is to have the right tools available. Most of the time spent is using tools that don't get the job done efficiently. Once you find that magic tool the job is a lot faster.
[Picture Journal] Polishing the Intake Manifold

Re: [Picture Journal] Polishing the Intake Manifold
long you say? I started and after a week of doing it, it ended up powdercoated! haha nice work man!
Re: [Picture Journal] Polishing the Intake Manifold
First post - February
Current post - December
Progress: Nowhere near done.
Long, I say!
Current post - December
Progress: Nowhere near done.
Long, I say!
Re: [Picture Journal] Polishing the Intake Manifold
The Mayan's say there's not much time left. Better hurry up. 
2004 Subaru WRX Silver, stage 2, minty interior.
2002 Subaru WRX Blue, SOLD (best E test numbers I've ever seen)
94 MX-6. Sold
92 GS KLZE 5 Speed
96 GS 5 speed, KLZE, Sold
95 GS Minty Shape Sold
92 GS Sold
92 GS Parts Car scrapped.
Feedback viewtopic.php?f=37&t=66348" onclick="window.open(this.href);return false;
7477th member.
I know you believe that you understand what you think I said but I'm sure you realize that what you heard is not what I meant.
Re: [Picture Journal] Polishing the Intake Manifold
did a little more grinding.
Think that took about 2 hours.
Think that took about 2 hours.
Last edited by SuperK on September 24th, 2014, 6:19 pm, edited 1 time in total.
-
fowljesse

- Supporting Member
- Posts: 5676
- Joined: March 17th, 2006, 2:59 pm
- Location: portland, OR
- Contact:
Re: [Picture Journal] Polishing the Intake Manifold
You're a sculptor. Nice work.
'93 GS - P&P DE w/ ZE exh. cams/ pistns, KLG4 IM, 65mm TB, MSnS, Phenos, K&N RAI, UDP, Grnd wires, rear batt, filld MM, torq strt, TWM short shftr, Exedy, Lng tube hdrs 2.5" Side exhaust, H&R sprngs, Poly bushngs, strutbars, Alum. crss mmber&tiebar, 22mm swybar, solid links, Direzzas, leather int, Alpine 9805 stereo & alrm, keyless entry, 10 Boston Accoustics spkrs, Prjectrs, Blaster2, CF hood, FG hatch, Lexan
Re: [Picture Journal] Polishing the Intake Manifold
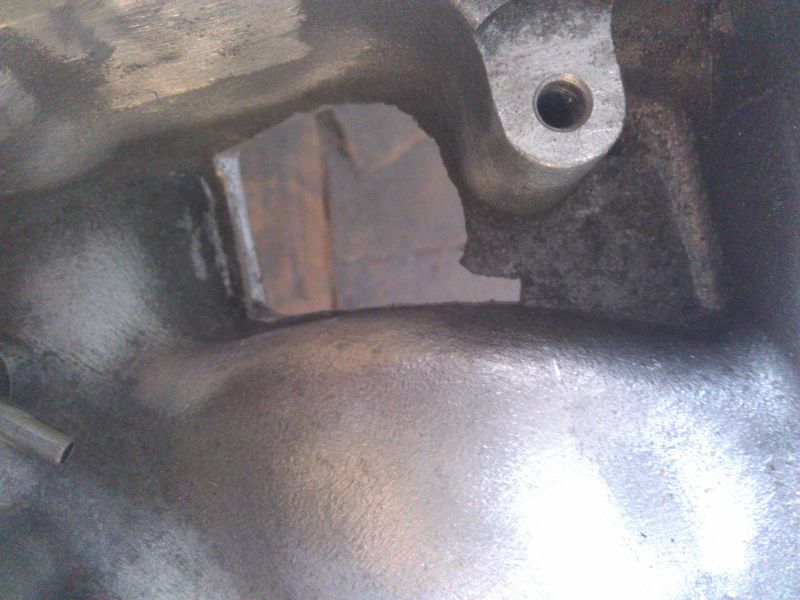
Did you grind out all that flashing or cut it out. I've found you can take out large chunks of aluminum pretty quick by drilling into it with a large sized drill bit. (start with small bit then get progressively bigger.) Or if you have a pneumatic body saw that could help too rather than grinding away at that stuff.
Re: [Picture Journal] Polishing the Intake Manifold
Haven't given up (yet) on this thing.
At one point I got discouraged so I started polishing just a corner so I wouldn't get discouraged.
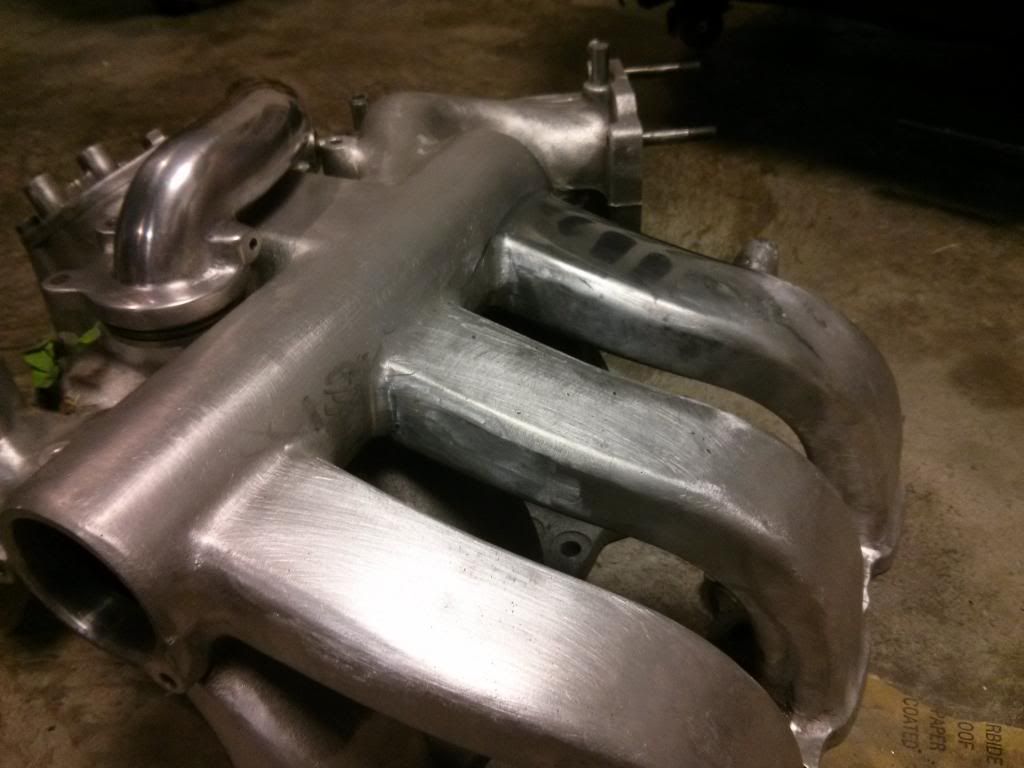
That gave me a little more motivation so I kept working at it.
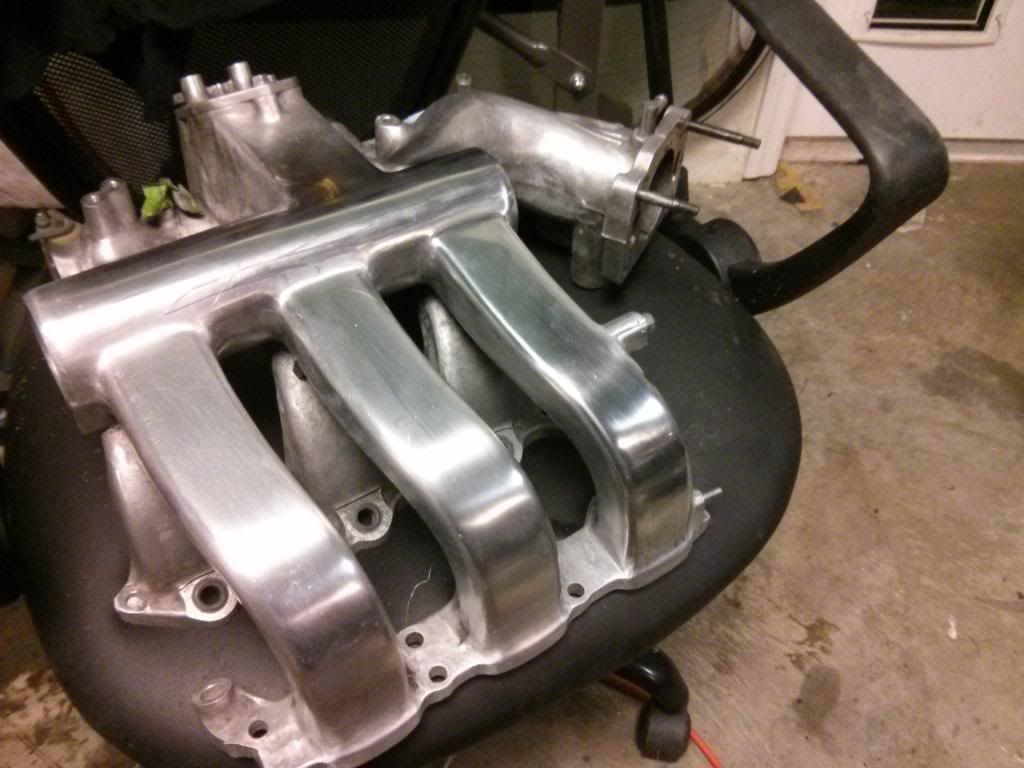
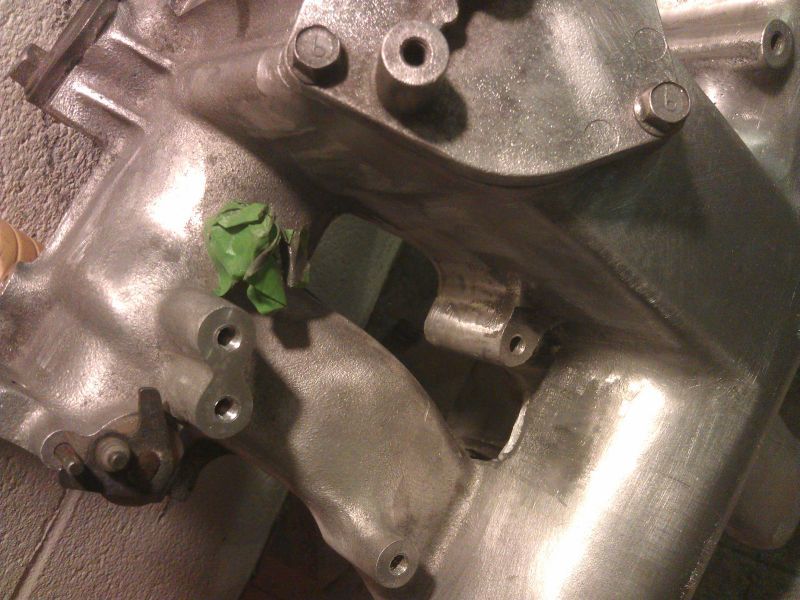
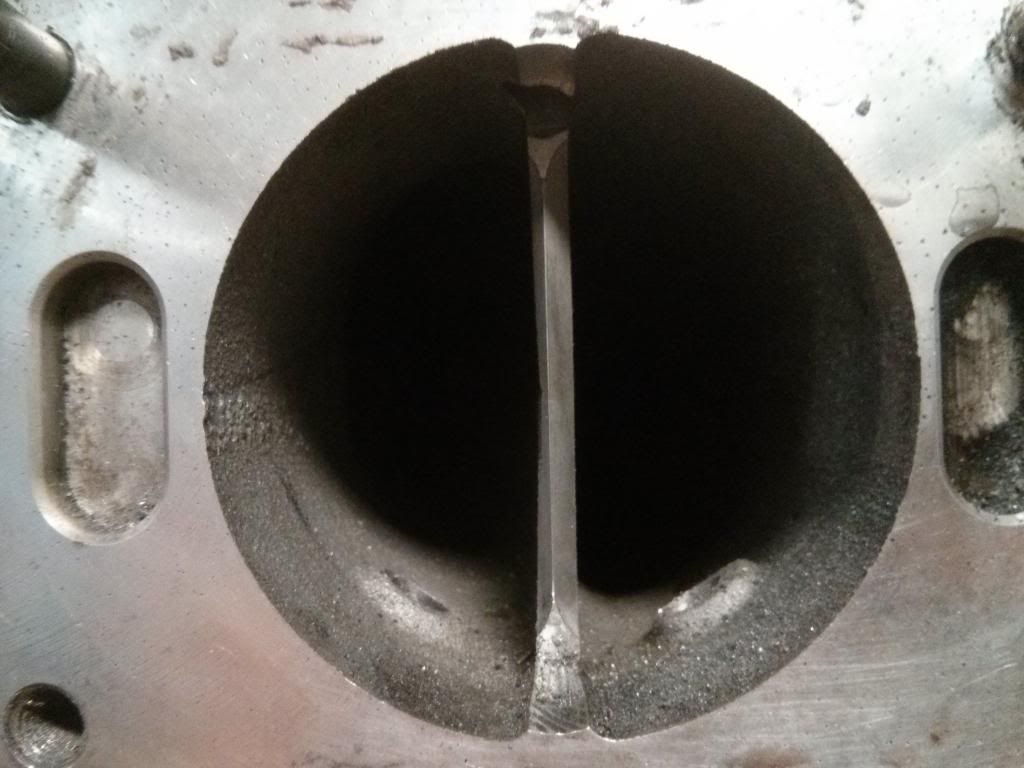
I then focused on the neck of the intake:
Before:
After:
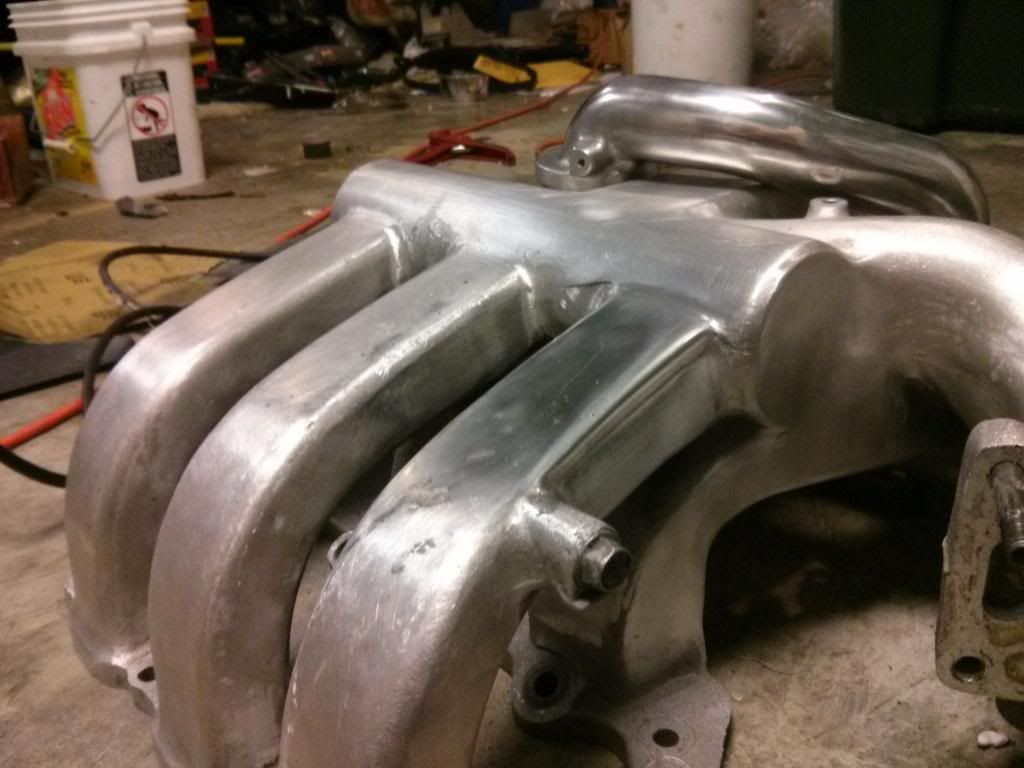
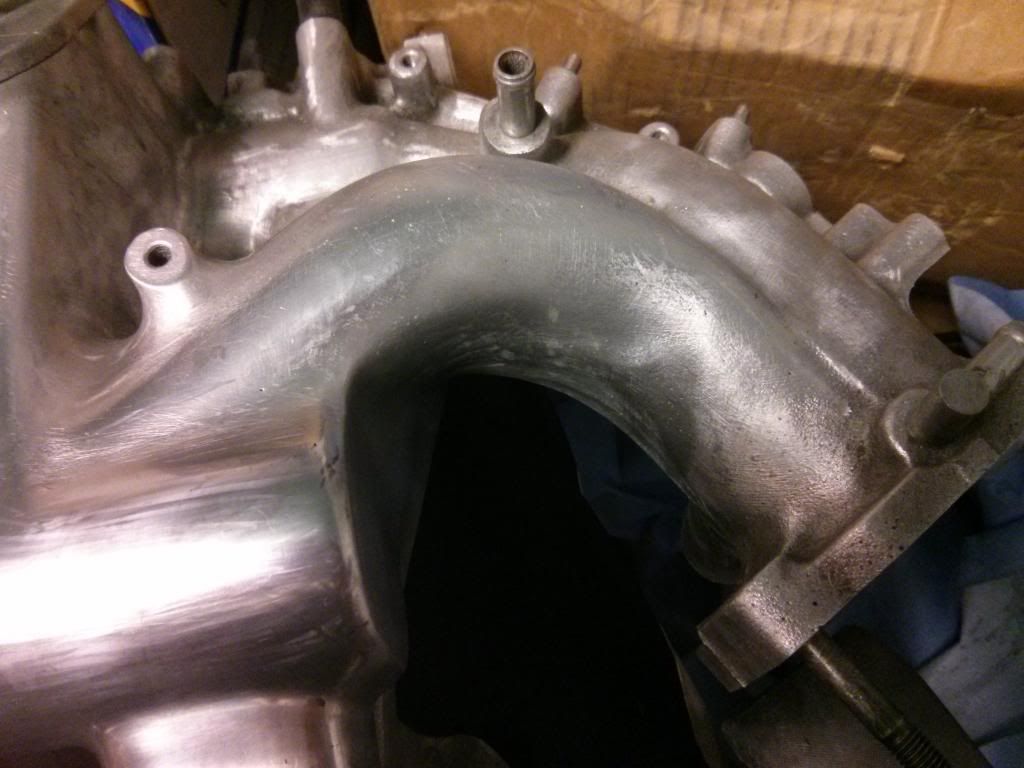
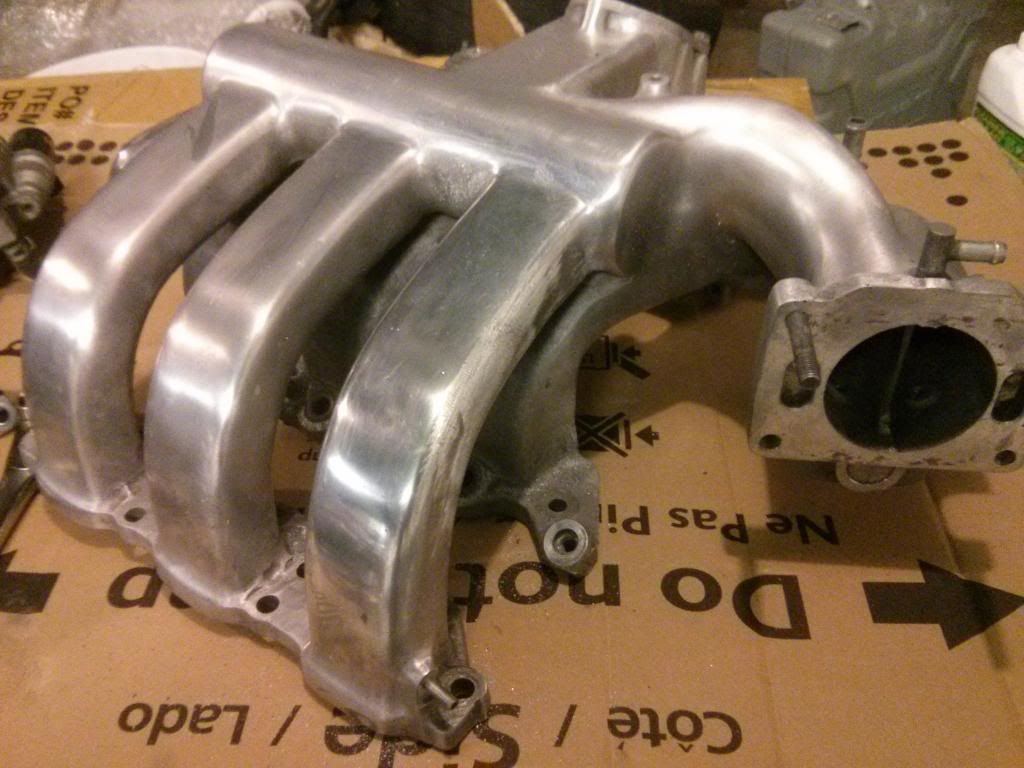
Comparing it to the Millennia intake, I am beginning to be pleased with my progress:
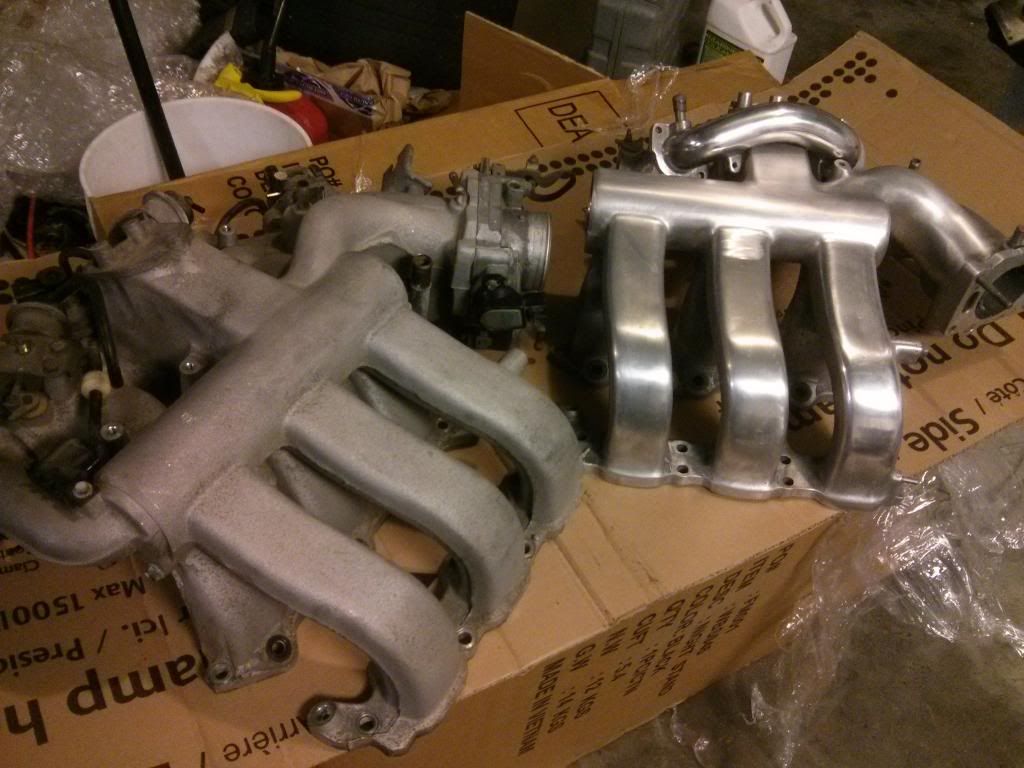
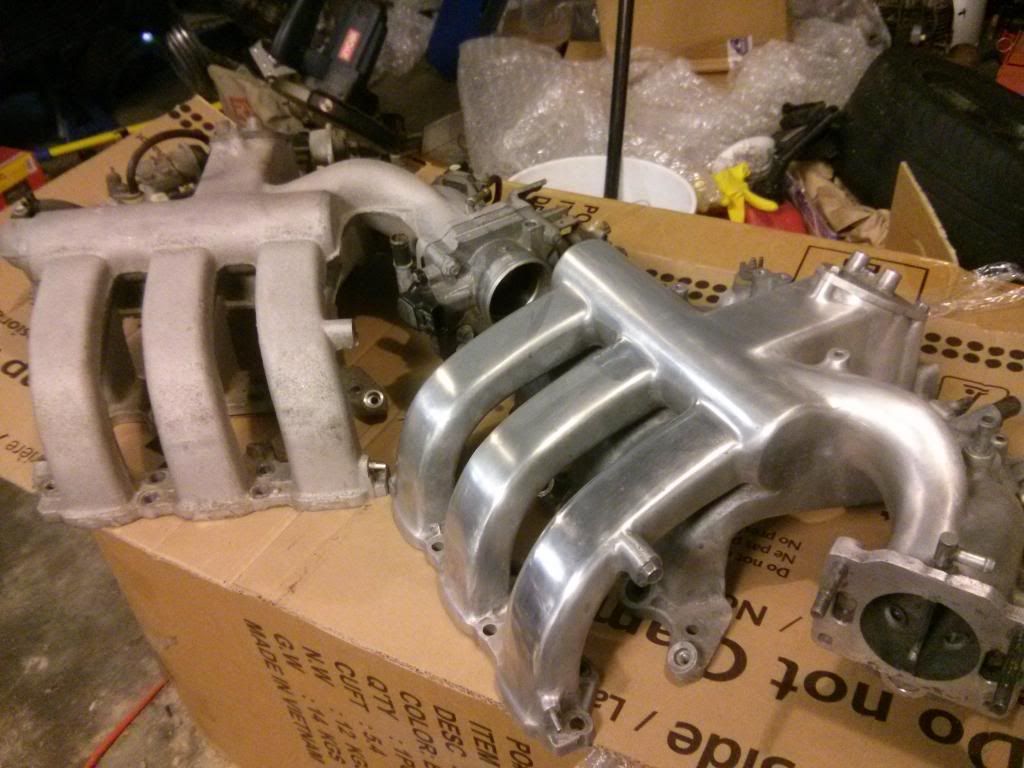
Seems like the intake throat of the Millenia manifold doesn't have a knife edged divider like the imported Xedos curve neck manifold.
Easy to identify by the "casting ridge" that's on main plenum on the Xedos manifold that's not on the Millennia one.
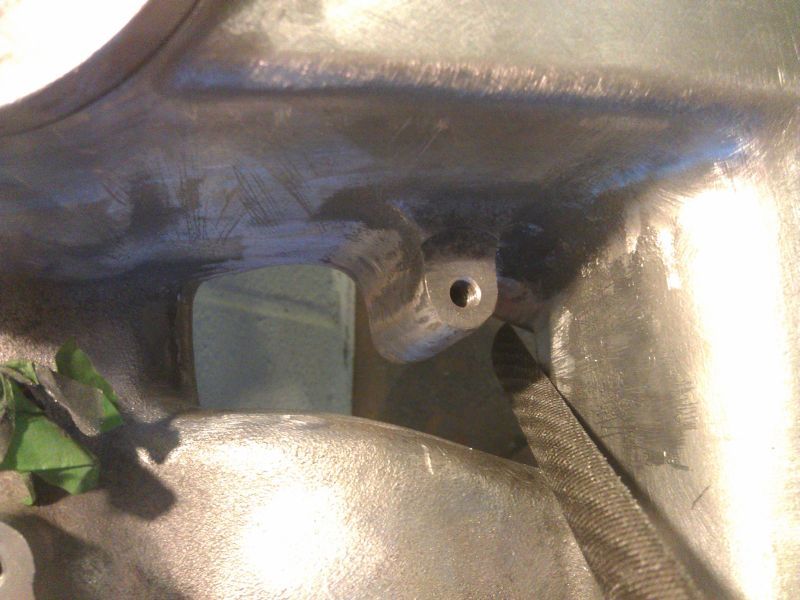
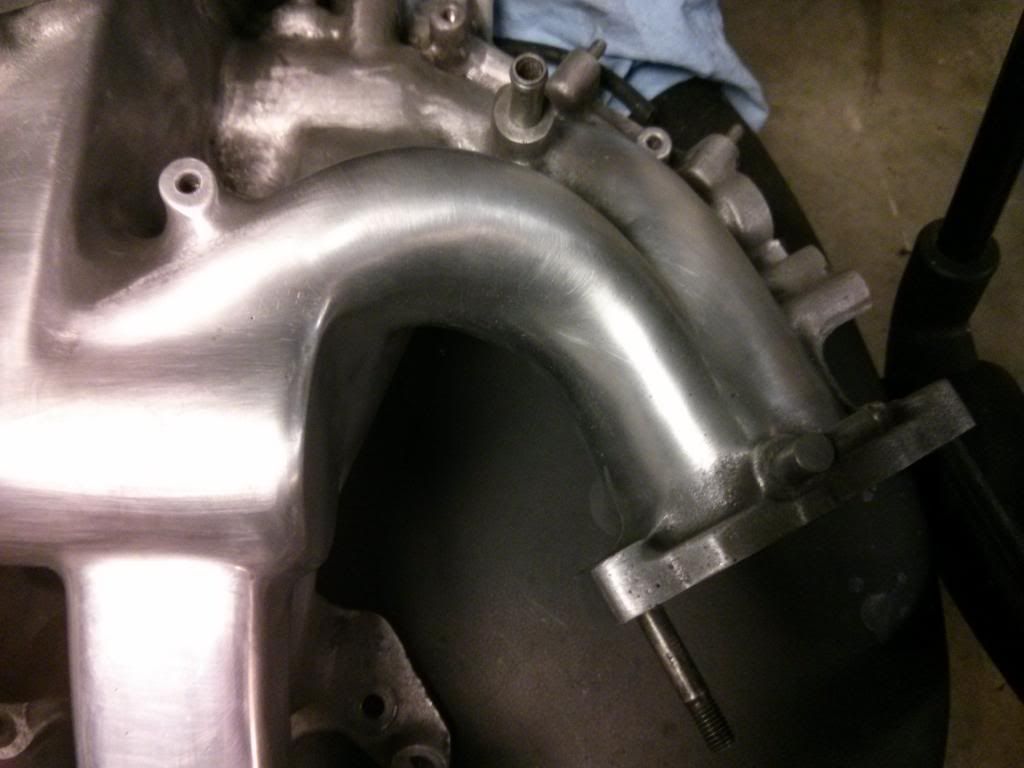
Then wanted to smooth out the top cap:
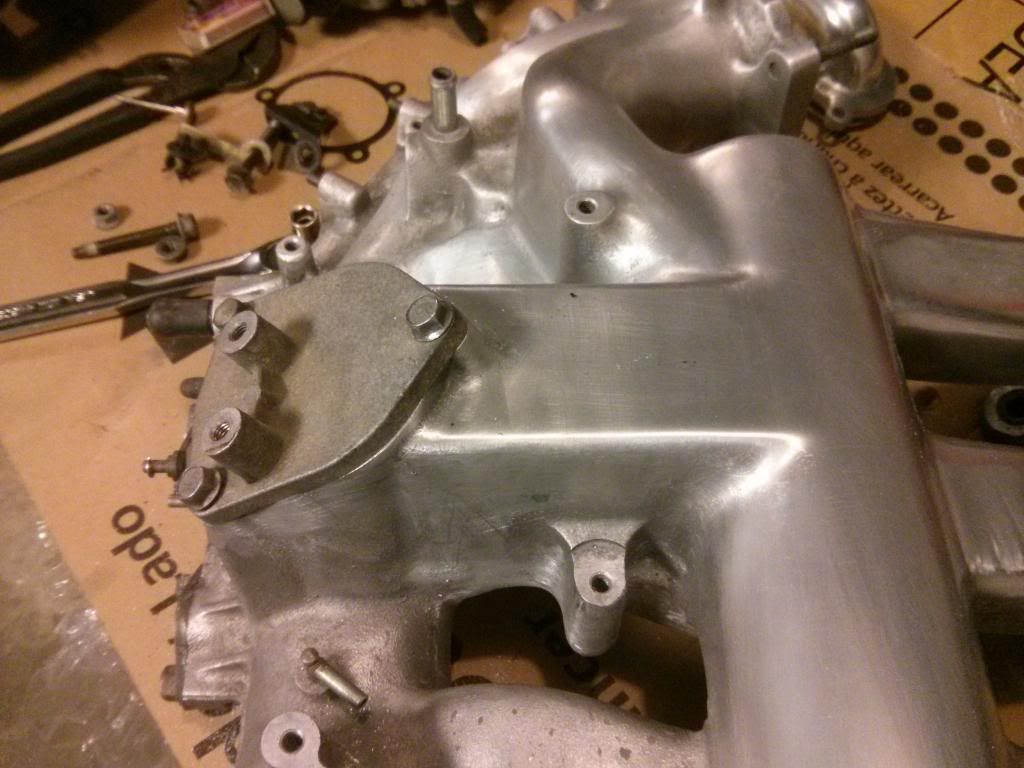
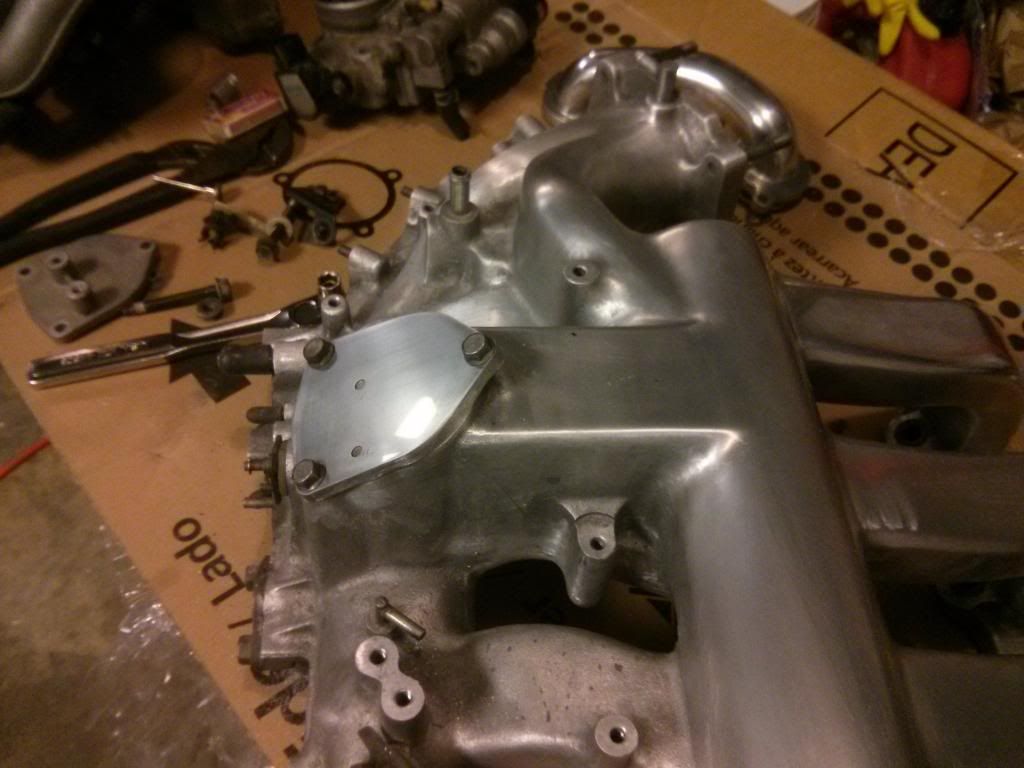
I think I will keep thinning that plate out , see if I can get a little more clearance out of it.
Also shaved off the nub:
"Clanky" has since this work taken all my free time. It's going to be many weeks before I can start back on this.
At one point I got discouraged so I started polishing just a corner so I wouldn't get discouraged.


That gave me a little more motivation so I kept working at it.

I then focused on the neck of the intake:
Before:

After:

Comparing it to the Millennia intake, I am beginning to be pleased with my progress:


Seems like the intake throat of the Millenia manifold doesn't have a knife edged divider like the imported Xedos curve neck manifold.

Easy to identify by the "casting ridge" that's on main plenum on the Xedos manifold that's not on the Millennia one.
Then wanted to smooth out the top cap:


I think I will keep thinning that plate out , see if I can get a little more clearance out of it.
Also shaved off the nub:

"Clanky" has since this work taken all my free time. It's going to be many weeks before I can start back on this.
Last edited by SuperK on September 24th, 2014, 6:20 pm, edited 1 time in total.
-
Josh

- Supporting Member
- Posts: 3432
- Joined: April 18th, 2002, 2:01 am
- Location: Washington state
- Contact:
Re: [Picture Journal] Polishing the Intake Manifold
Looking good! keep up the good work.
Josh
95' AWD MX-3 RST - (work log - http://www.mx-3.com/phpBB3/viewtopic.php?f=46&t=73765 )
94' GS - KLZE DD (work log - viewtopic.php?uid=2713&f=46&t=79063&start=0 )
05' MS RX-8 - Parted out and Sold :'(
Feedback - http://www.mx-3.com/phpBB3/viewtopic.php?f=37&t=49519
Cardomain Page - http://www.cardomain.com/ride/408020
Face Book page http://www.facebook.com/pages/Mazda-MX- ... 3472959216
Re: [Picture Journal] Polishing the Intake Manifold
Corded Power Drill
http://www.sears.com/craftsman-1-2-in-c ... ckType=G10
I use a Craftsman because it had a trigger lock and a handle. Both features are very useful. Any power drill will do.
Power Drill Accessories
Corded Rotary Tool
http://www.dremel.com/en-us/Tools/Pages ... t1qLHko6TM
I use dremel brand w/variable speed. Any brand will do.
Rotary Tool Accessories
Metal File Set
http://www.sears.com/nicholson-5pc-hand ... ockType=G1
I purchased the above on sale. Find a set with:
Sandpaper
http://www.magnate.net/ProductDetails.a ... Code=PG169
Silicon Carbide Wet/Dry, in bulk
List of grit based on how tenacious you are:
I break up the costs in two categories:
Invested and disposed currency.
Then invested currency will be the cost of reusable tools: Power tools, mandrels, files.
The disposed currency are the cost of materials that are not reusable: Sanding bands and sandpaper.
Although you need to budget both categories before committing to hours upon grueling hours of monotonous, disparaging work, only the disposed currency is the actual cash value you're placing in your intake manifold... plus dozens of wasted labor hours you could have spent working overtime and making thousands of extra dollars.
There are many other tools and methods to polishing. I chose this particular route because I felt in control of how much material I was removing, and it offered a good deal of precision.
But be warned... it is a long... long, boring, long, boring, long, long, boring, long, boring task.
I also recommend a laptop connected to multiple series streaming sites. Just sit, sand and stare. It's a great way to get caught up on series that your friends are talking about, but you can't justify sitting down and dedicating time to watch that particular show.
I can now talk to my friends about Trueblood (and how terrible it is) and have successfully not wasted any productive time watching it.
http://www.sears.com/craftsman-1-2-in-c ... ckType=G10
I use a Craftsman because it had a trigger lock and a handle. Both features are very useful. Any power drill will do.
Power Drill Accessories
- 2" sanding drum - http://www.amazon.com/Vermont-American- ... 716&sr=1-2
1" sanding drum - http://www.amazon.com/Vermont-American- ... 825&sr=1-1
Refills in bulk. Both the 2" and 1" refills I purchase sears brand in-store. There are 20-something misc assorted rough-fine drums very cheap. I didn't find them online so may be instore only. Any brand will do, others available online.
Corded Rotary Tool
http://www.dremel.com/en-us/Tools/Pages ... t1qLHko6TM
I use dremel brand w/variable speed. Any brand will do.
Rotary Tool Accessories
- Sanding drums - http://www.amazon.com/Jumbo-51pc-Drum-S ... y_hi_img_y
Reinforced cutting wheels - http://www.amazon.com/Dremel-426-Fiberg ... d_sim_hi_2
Refills galore. I purchase mine in bulk at sears in-store. can order them online too.
Metal File Set
http://www.sears.com/nicholson-5pc-hand ... ockType=G1
I purchased the above on sale. Find a set with:
- Handles
Mill Bastard
Round Mill Bastard
Half Round Mill Bastard
Both Rasp and Files
Sandpaper
http://www.magnate.net/ProductDetails.a ... Code=PG169
Silicon Carbide Wet/Dry, in bulk
List of grit based on how tenacious you are:
- 100
200
400
800
1000
1500
2000
2500
I break up the costs in two categories:
Invested and disposed currency.
Then invested currency will be the cost of reusable tools: Power tools, mandrels, files.
The disposed currency are the cost of materials that are not reusable: Sanding bands and sandpaper.
Although you need to budget both categories before committing to hours upon grueling hours of monotonous, disparaging work, only the disposed currency is the actual cash value you're placing in your intake manifold... plus dozens of wasted labor hours you could have spent working overtime and making thousands of extra dollars.
There are many other tools and methods to polishing. I chose this particular route because I felt in control of how much material I was removing, and it offered a good deal of precision.
But be warned... it is a long... long, boring, long, boring, long, long, boring, long, boring task.
I also recommend a laptop connected to multiple series streaming sites. Just sit, sand and stare. It's a great way to get caught up on series that your friends are talking about, but you can't justify sitting down and dedicating time to watch that particular show.
I can now talk to my friends about Trueblood (and how terrible it is) and have successfully not wasted any productive time watching it.
-
mitmaks

- Senior Member
- Posts: 8704
- Joined: September 10th, 2001, 2:01 am
- antispam: ~SPAM*SUX~
- Location: Spokane, WA
- Contact:
Re: [Picture Journal] Polishing the Intake Manifold
It's getting there 
Magnum s/s lines, strut bars, carbon fiber bezel, indiglow gauge, Sony Xplod, inverted c/f hood, SRD lower tie bar '93 GS SE '95 Cobra SVT #2722 '68 Charger R/T 440
http://www.cardomain.com/id/mitmaks

http://www.cardomain.com/id/mitmaks