Hey guys, I had an idea the other day that, seeing as I have a spare set of front indicators (one with clear, the other orange lense), I thought I might take apart the orange one, paint the inside gloss black, then fit the clear lense on it, to see if I like it better than my clear fronts, with just the stock silver internal finish. I've just tried taking one of the orange ones apart, but have only managed to snap a small bit of the housing off! Anyone taken these apart before? They're really not budging at all!! I noticed that theres some black stuff (which I thought was just a rubber seal at first), so I have to get rid of that? Or is it just not really possible?!
Any help is much appreciated!!
Has anyone taken apart the front indicators?!
-
ethand

- Regular Member
- Posts: 766
- Joined: October 21st, 2010, 10:44 pm
- antispam: ~SPAM*SUX~
- Location: Western Australia
Has anyone taken apart the front indicators?!
'92 JDM Eunos Presso - Zeke
-
marcdh

- Regular Member
- Posts: 1460
- Joined: July 26th, 2006, 3:54 pm
- Location: Belfast -Northern Ireland
- Contact:
Re: Has anyone taken apart the front indicators?!
You need to heat them in an oven to loosen up the glue. Or maybe a hair dryer and gentle prying would do. With the oven it's a fine line between melting them and just softening the glue 
AZ-3 1498cc Turbo! EVO 8 turbo and manifold, 5 stud swap, SSR Type C, DIYPNP seq Megasquirt
Mx-3 2.5 V6 Turbo 291 BHP 251 lbft @ 8psi - Retired due to rust and back at uni
View Worklog

Mx-3 2.5 V6 Turbo 291 BHP 251 lbft @ 8psi - Retired due to rust and back at uni
View Worklog
-
youdirtyfox
- Regular Member
- Posts: 855
- Joined: October 8th, 2009, 12:36 pm
- antispam: No
- Location: United Kingdom
Re: Has anyone taken apart the front indicators?!
hairdryer is the method I use > done about 5 pairs now!
Gently heat one side then run a knife down it to break the seal, then the other side. then a bit more hairdryer mainly on the tabs, once there a little too hot to touch for too long the peice over the tab will be soft enough to be able to push up and you can pull the tab out from under it. I usually do one side first then the other then once all tabs are popped forward a bit more heat and the lense will pull out forward.
I also rest the indicator in a big jug or cup so you can rotate it while heating to keep it semi hot all the way round.
-
ethand
- Regular Member
- Posts: 766
- Joined: October 21st, 2010, 10:44 pm
- antispam: ~SPAM*SUX~
- Location: Western Australia
Re: Has anyone taken apart the front indicators?!
Awesome, thanks a stack for the tips, guys, and for the detailed writeup, youdirtyfox - I thought I had heard of people putting their headlights in the oven to open them, and I was hoping I wouldn't have to do the same - pretty sure I'd manage to melt them!
Now... I wonder if my sister will let me borrow her hair dryer...? Haha
Now... I wonder if my sister will let me borrow her hair dryer...? Haha
'92 JDM Eunos Presso - Zeke
-
MrMazda92

- Supporting Member
- Posts: 5202
- Joined: October 8th, 2009, 5:35 pm
- antispam: No
- Location: Midwest
Re: Has anyone taken apart the front indicators?!
A little late, but the UK guys have many how-tos that I've found helpful, even if names of certain items differ. 
Clear corner conversion
Clear corner conversion
Daily:
'12 Challenger R/T + STP - Magnuson 2650 blower (7 PSI), Skip-Shift/CDV deleted, StopTech ST60 front brakes, Hellcat rear Cradle/Brakes, 2 piece DS. 6 speed, 3.9 LSD, 18" wheels - 510 WHP
Kid Hauler:
'08 Suburban LT 4WD - TVS 1900 Blower, LF SC Cam, headers, AFM delete, true 5" lift, 33x12s, 523 WHP
First Love:
'92 GS 5 spd - Straightneck KL/67mm TB, MegaSquirt/Coilpacks, 5 lugs/Speed6 brakes/FD wheels, wiretuck, coilovers, headers, AEM WB, Borla
Deleted: VAF/Power Steering/Air Conditioning/EGR/ABS/Auto Seatbelts/etc
-
Mooneggs
- Forum Moderator
- Posts: 6128
- Joined: August 10th, 2005, 10:08 pm
- antispam: ~SPAM*SUX~
- Location: Hillsboro, OR
- Contact:
Re: Has anyone taken apart the front indicators?!
oven or hairdryer will work, I painted the insides of mine black and have the details somewhere in my DD worklog:)
My Feedback
92 mx-3 gs klze 'race car' IP 15.05 @ 92.5mph
92 mx-3 gs klze 'daily driver' IP 14.55 @ 95.7mph
http://www.cardomain.com/id/Mooneggs

92 mx-3 gs klze 'race car' IP 15.05 @ 92.5mph
92 mx-3 gs klze 'daily driver' IP 14.55 @ 95.7mph
http://www.cardomain.com/id/Mooneggs
-
youdirtyfox
- Regular Member
- Posts: 855
- Joined: October 8th, 2009, 12:36 pm
- antispam: No
- Location: United Kingdom
Re: Has anyone taken apart the front indicators?!
She wont mind , or even know I used the wifes brand new one hahaha
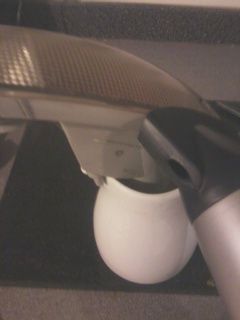
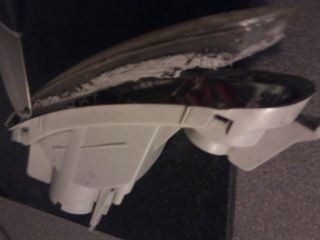
I also found it usefull to reheat the tab area on the outer casing once youve removed the lense then it can be reshaped flat again, so when you come to put it back together (with a little more heat) you get a nice secure fitment back together.
The "cleared" ones I produce. I got in there with a mini steam cleaner to remove all the built up grime around the lense.
-
ethand
- Regular Member
- Posts: 766
- Joined: October 21st, 2010, 10:44 pm
- antispam: ~SPAM*SUX~
- Location: Western Australia
Re: Has anyone taken apart the front indicators?!
Awesome! Sorry, Mooneggs, I fully forgot you'd done that! Shoulda thought to search the 60-odd pages of your combined worklogs (not that I havent done that several times before!!! Hahaha I'm thinking I'll do without the orange thing you have in yours, just get a chromed orange bulb 
Thanks youdirtyfox for the tip - I'll defs do that, but it'll have to wait til I put them all back together! I'll also have to give it a shot at cleaning the lenses, too - I don't have a steam cleaner, but I'll see what I can manage! I disassembled them this morning (just after my last post), got it all painted, gonna leave it overnight, then put them back together on Thursday, as I'm working both jobs tomorrow, so won't have any spare time! I'll post some pics when I'm done The paint has come up really really well, I'm stoked so far. I just hope it doesn't look funny when I install them! I'm also thinking I might try adding the parkers that the Euro models have in theirs - mine has the bulb holder, but no wiring. My spare set of indicators has the wiring, I just have to figure out how to connect it! haha.
Thanks also for the tip, MM92, I shoulda thought of that! I tried searching here, but couldn't seem to find anything.
EDIT: FOUND IT!! mooneggs, I just finally found the part of your WL where you did this to your DD!! It's on Pg 20... only took me a few hours to find it lol... I kept getting distracted & reading all the interesting things you've done lol...
Checked out the pics, looks like my plans are ostensibly the same as you did, only I'm using high gloss black (coz I'm that kinda person haha). Seeing how it looks on your car up close gives me hope that it will work well on mine. If it doesn't look right just yet, it will look great with the things I have planned in the future (black altezzas & a set of painted glass headlamps, much like yours). I think I might have to wait til I return from Italy, though, and see what funds I have remaining after that. Saving hard now so I don't have to work so much while I live there!
Thanks youdirtyfox for the tip - I'll defs do that, but it'll have to wait til I put them all back together! I'll also have to give it a shot at cleaning the lenses, too - I don't have a steam cleaner, but I'll see what I can manage! I disassembled them this morning (just after my last post), got it all painted, gonna leave it overnight, then put them back together on Thursday, as I'm working both jobs tomorrow, so won't have any spare time! I'll post some pics when I'm done
Thanks also for the tip, MM92, I shoulda thought of that! I tried searching here, but couldn't seem to find anything.
EDIT: FOUND IT!! mooneggs, I just finally found the part of your WL where you did this to your DD!! It's on Pg 20... only took me a few hours to find it lol... I kept getting distracted & reading all the interesting things you've done lol...
Checked out the pics, looks like my plans are ostensibly the same as you did, only I'm using high gloss black (coz I'm that kinda person haha). Seeing how it looks on your car up close gives me hope that it will work well on mine. If it doesn't look right just yet, it will look great with the things I have planned in the future (black altezzas & a set of painted glass headlamps, much like yours). I think I might have to wait til I return from Italy, though, and see what funds I have remaining after that. Saving hard now so I don't have to work so much while I live there!
'92 JDM Eunos Presso - Zeke
-
ethand
- Regular Member
- Posts: 766
- Joined: October 21st, 2010, 10:44 pm
- antispam: ~SPAM*SUX~
- Location: Western Australia
Re: Has anyone taken apart the front indicators?!
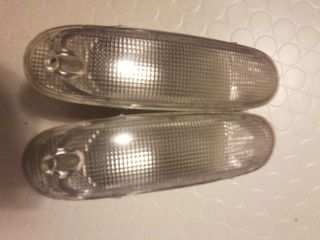
Done!
Here's how it turned out if you're interested...


Here's how it turned out if you're interested...


'92 JDM Eunos Presso - Zeke
-
MrMazda92
- Supporting Member
- Posts: 5202
- Joined: October 8th, 2009, 5:35 pm
- antispam: No
- Location: Midwest
Re: Has anyone taken apart the front indicators?!
It looks good Ethan, good job!
Daily:
'12 Challenger R/T + STP - Magnuson 2650 blower (7 PSI), Skip-Shift/CDV deleted, StopTech ST60 front brakes, Hellcat rear Cradle/Brakes, 2 piece DS. 6 speed, 3.9 LSD, 18" wheels - 510 WHP
Kid Hauler:
'08 Suburban LT 4WD - TVS 1900 Blower, LF SC Cam, headers, AFM delete, true 5" lift, 33x12s, 523 WHP
First Love:
'92 GS 5 spd - Straightneck KL/67mm TB, MegaSquirt/Coilpacks, 5 lugs/Speed6 brakes/FD wheels, wiretuck, coilovers, headers, AEM WB, Borla
Deleted: VAF/Power Steering/Air Conditioning/EGR/ABS/Auto Seatbelts/etc
'12 Challenger R/T + STP - Magnuson 2650 blower (7 PSI), Skip-Shift/CDV deleted, StopTech ST60 front brakes, Hellcat rear Cradle/Brakes, 2 piece DS. 6 speed, 3.9 LSD, 18" wheels - 510 WHP
Kid Hauler:
'08 Suburban LT 4WD - TVS 1900 Blower, LF SC Cam, headers, AFM delete, true 5" lift, 33x12s, 523 WHP
First Love:
'92 GS 5 spd - Straightneck KL/67mm TB, MegaSquirt/Coilpacks, 5 lugs/Speed6 brakes/FD wheels, wiretuck, coilovers, headers, AEM WB, Borla
Deleted: VAF/Power Steering/Air Conditioning/EGR/ABS/Auto Seatbelts/etc
-
Nd4SpdSe

- Senior Member
- Posts: 11213
- Joined: May 25th, 2002, 2:01 am
- Location: Québec City, Quebec, Canada
- Contact:
Re: Has anyone taken apart the front indicators?!
I did it on my Mx-3 with the stock orange ones; baked them in the oven. I got the idea after I did my hybrid stock-altezza tails and it gives them the tinted look, without actually being tinted, so still being legal. Plus with the MS bumper, I lost the side markers so I put those bulbs into the signals, and I'm a fan of bright lights

1992 Mazda Mx-3 GSR - 2.5L KLZE : Award Winning Show Car & Race Car ['02-'09] (Retired)
2004 Mazda RX-8 GT - Renesis Wankel : LS3 Coils, BHR Mid-Pipe + Falken RT-615K 245/40r18
2011 Mazda Mazda2 GS - 1.5L Manual : Yozora Edition (1 of 500)
2003 Nissan Xterra SE - 4x4 Supercharged : 2" Body Lift, 4" Suspension Lift & 33" MTR Kevlar
2001 Nissan Frontier SE - The Frontrailer : Expedition/Off-Road Trailer Project